20+ Years Experience
Specialist Epoxy Resin Flooring
Have you ever walked into a room and admired the smooth, even flooring beneath your feet? Chances are, the secret behind that perfect finish is a well-chosen floor screed.
In this comprehensive guide, we’ll dive into the world of floor screeding, exploring the different types, applications, and factors to consider when choosing the right screed for your project.
Join us as we unravel the fascinating intricacies of this often overlooked but crucial element of construction.
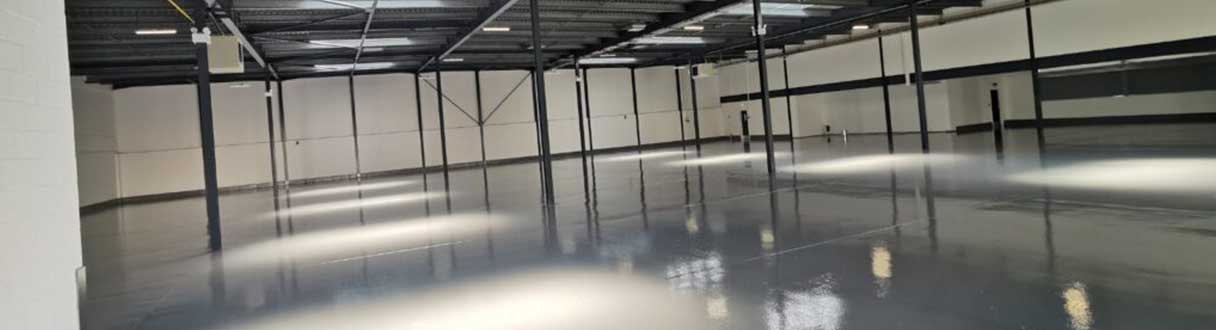
Floor screed is a thin layer of material used in construction to create a smooth and level surface for various flooring finishes.
It is typically composed of sharp sand, cement, and water, with additives to improve certain characteristics, and can be reinforced with a wire mesh if necessary.
The three main types of floor screed include traditional cement sand screed, calcium sulfate pumpable self-smoothing screed, and liquid screeds, each with its own unique properties structural performance and benefits.
Traditional cement sand screed is a versatile and cost-effective solution that has been used in the construction industry for decades.
This type of screed is created by mixing cement and sand in a 1:3-5 ratio, resulting in a strong, durable base layer for other flooring materials.
Its popularity is due to its many advantages, such as its strength, ease of installation, and compatibility with a wide range of applications.
However, traditional cement sand screed does have its drawbacks. The most notable downside is its long drying time, which can extend the overall project timeline.
Moreover, it may not be suitable for areas with high humidity or moisture, as it can be prone to shrinking and cracking under such conditions.
Calcium sulfate pumpable self-smoothing screed is a more advanced option that offers benefits such as faster application and increased coverage compared to traditional cement sand screed.
This type of screed can be laid either bonded or unbonded, with a nominal depth of 40mm for bonded applications and a minimum thickness wearing screed of 25mm as recommended by BS 8204 Part 7.
The pumpable nature of calcium sulfate screed makes it easier to apply and spread evenly, ensuring a high-quality finish.
This type of screed is particularly well-suited for larger construction projects or those with complex layouts, as it can cover a greater area in less time than traditional screed options.
Liquid screeds are a more recent innovation in the world of floor screeding, offering distinct advantages over traditional options.
These screeds are highly responsive to environmental moisture and require careful installation to ensure that no moisture or humidity in the room can affect the flooring finish.
Liquid screeds are typically applied using a pump and tripod leveling gauges to ensure a consistent depth and level surface, with the screed poured from a hose and manually agitated to eliminate air bubbles.
In terms of thickness, liquid screed requirements are similar to those of calcium sulfate screeds, with a minimum thickness of 25mm for bonded applications, 30mm for unbonded, and 35mm for a floating finish.
Liquid screeds are an excellent option for those seeking a high-quality finish with reduced drying times and minimal surface preparation.
Floor screed is a versatile material with a range of practical applications, from leveling uneven floors to the walls, providing a thick and stable base for underfloor heating systems and creating a smooth surface for further preparation.
Understanding the specific requirements of your project is crucial in selecting the appropriate screed type and ensuring the best possible results.
Levelling uneven floors is one of the most common applications for floor screed. A well-prepared base is essential for achieving a smooth, even finish, and floor screed is the ideal material for this purpose.
Levelling floor screeds not only provide a flat surface for various flooring finishes, but also serve as a supportive base for underfloor heating systems.
When leveling a floor, it is important to choose the right type of screed for the job. Traditional cement sand screed is a popular choice due to its strength and durability, while calcium sulfate and liquid screeds offer additional benefits such as faster application and increased coverage. The optimal choice will depend on factors such as project requirements, budget, and desired finish.
Underfloor heating systems are gaining popularity for their energy efficiency and ability to provide even, comfortable warmth throughout a room.
These systems can be either electric or hydronic, with electric systems using cables or mats to generate heat and hydronic systems utilising hot water pipes.
Regardless of the type of underfloor heating system chosen, a properly prepared floor screed is essential to ensure even heat distribution and optimal performance.
Floor screed serves as a stable base for underfloor heating systems, helping to evenly distribute heat and prevent hot or cold spots.
The choice of material for this application will depend on factors such as the type of underfloor heating system, project budget, and desired finish.
Liquid screeds, in particular, are popular for their compatibility with underfloor heating systems, offering reduced drying times and minimal surface preparation requirements.
In addition to leveling uneven floors and providing a base for underfloor heating systems, floor screed can be used to create a smooth, even surface for further preparation. This is particularly important when installing floor tiles, wood or other finishes that require a flat, stable base for proper adhesion.
Preparing a smooth surface with floor screed involves removing any dust, debris, or contaminants from the base, roughening the surface to ensure optimal adhesion, and applying a suitable levelling compound or self-levelling compound to even out any irregularities.
Proper surface preparation is essential for achieving a high-quality finish and ensuring the longevity of the flooring material.
The thickness and design criteria of floor screed depend on factors such as the type of screed, whether it is bonded or unbonded, and other considerations such as the size of the area, ease of access, and location of the property.
Understanding these factors is essential for choosing the optimal screed thickness and design for your project.
Bonded screeds adhere directly to the concrete subfloor, providing a strong connection between the screed and the base.
Unbonded screeds, on the other hand, are typically placed on top of a plastic sheet or another type of membrane, rather than being laid directly on the concrete floor or other substrates.
Both bonded and unbonded screeds have specific thickness requirements, with bonded screeds typically needing a thickness of 35-40mm and unbonded screeds requiring a minimum thickness of 70mm.
The choice between bonded and unbonded screeds will depend on factors such as the type of flooring material, the size of the area, and the specific requirements of the project.
Bonded screeds offer a stronger connection to the base, while unbonded screeds may be more suitable for projects with specific moisture or insulation requirements.
When determining the thickness and design of floor screed, several factors must be taken into consideration. These include the architecturally specified floor finishes, construction tolerances, provision of falls, and in some cases, structural requirements.
The type of screed and whether it is bonded or unbonded will also play a role in the design process.
It is essential to consult relevant guidelines, such as BS 8204 Parts 1, 2, 3, and CIRIA report 184, and consider factors such as strength, bonding, and moisture control when designing floor screed.
Taking these factors into account will help ensure a successful and durable installation that meets the requirements of your project.
The cost of floor screed is an important consideration when planning a construction project, as it can have a significant impact on the overall budget.
Floor screed costs depend on factors such as the type of floor screed cost, the amount of material required, and labor expenses.
Understanding these factors will help you make informed decisions about the most cost-effective solution for your project.
Material costs for floor screed can vary depending on the type of screed used and the location. For example, a basic cement and sand screed may cost between £14 and £18 per square meter, while the average liquid screed cost is £21.50 per meter squared. Unbonded traditional screed is estimated to cost £10-£15 per square meter.
It is essential to consider the material costs of your chosen screed type, as well as factors such as delivery fees and any additional materials required for installation. By carefully considering these costs, you can make an informed decision about the most cost-effective solution for your project.
Labor expenses are another key factor in determining the overall cost of floor screed installation. These can vary depending on factors such as the expertise of the workers, the size of the project, and the type of screed being installed. Generally, labor costs range from £10-£12 per m2 or £120-£200 per day.
When budgeting for labor expenses, it’s important to consider factors such as travel time, tools, training, and transportation, as these can all contribute to the overall cost of the project.
By carefully considering these factors and obtaining quotes from multiple professionals, you can find the most cost-effective solution for your floor screed installation.
The process of installing floor screed is a crucial aspect of any construction project, as it affects the quality and durability of the final flooring surface. Floor screed installation involves several key steps, including base preparation, mixing and spreading screed, and drying and curing.
Understanding each of these steps is essential for a successful and efficient installation.
Before applying floor screed, it is essential to properly prepare the base. This entails removing any dust, debris, or contaminants from the base, roughening the surface to ensure optimal adhesion, and applying a suitable levelling compound or self-levelling compound to even out any irregularities.
Proper base preparation is critical for achieving a high-quality finish and ensuring the longevity of the flooring material.
In addition to preparing the surface, it is important to consider factors such as the type of screed, whether it is bonded or unbonded, and other considerations such as the size of the area, ease of access, and location of the property.
These factors will influence the overall success of the floor screed installation process.
Once the base is properly prepared, the next step in the floor screed installation process is mixing and spreading the screed. The screed mix is a combination of cement, water, and sand, with the mix ratio ranging between 1:3 – 1:5 cement to sand, depending on the desired consistency and other factors.
The traditional standard screed mix ratio is 1:4 cement to sand, resulting in a soft, malleable texture that is easy to work with.
Spreading the screed mix evenly and compactly is crucial for achieving a high-quality finish. This can be done using a trowel and a batten to ensure a level surface.
The time required to screed an average-sized room will depend on factors such as the type of screed used, the size of the area, and the expertise of the workers, with estimates ranging from 6-7 hours.
The final step in the floor screed installation drying process is the drying process and curing. Drying involves removing all moisture from the screed, while curing serves to preserve the shape and prevent cracking by retaining moisture. Ideal conditions for drying floor screed include a temperature of approximately 20°C and well-ventilated spaces.
The approximate drying time for various types of floor screeds can vary, with cement liquid screeds requiring two to three weeks for a 40mm thick floor in ideal drying conditions, and calcium sulfate screeds typically taking around 40 days to fully dry out.
Ensuring proper drying and curing conditions is critical for a successful and durable installation.
Selecting the right floor screed for your project is a crucial decision that can impact the overall success and durability of your flooring.
Factors to consider when choosing the right screed include the time required for installation, budget, type of application, strength of the screed, thickness of the screed, and desired finish.
By taking these factors into account, you can make an informed decision about the most suitable screed for your project.
In addition to considering these factors, it is essential to consult relevant guidelines and industry experts when selecting the appropriate floor screed. By doing so, you can ensure that you choose the best screed for your specific requirements, resulting in a high-quality, durable, and long-lasting flooring solution.
The decision to hire a professional or attempt DIY screeding depends on factors such as experience, budget, and the complexity of the project.
While DIY screeding may be a more cost-effective option for those with experience and the necessary tools, it can be risky for those without the proper knowledge and skills.
Hiring a professional for your floor screed installation ensures that the job is completed to a high standard, with minimal risk of errors or issues arising in the future.
Professionals have the expertise, equipment, and experience necessary to complete the project efficiently and effectively, providing you with peace of mind and a high-quality finish.
Ultimately, the decision between hiring a professional and attempting DIY screeding will depend on your individual circumstances and preferences.
The correct mix for floor screed is usually a mixture of cement and sharp sand in a ratio of 1:3 or 1:4.5. This combination ensures the screed provides maximum strength while allowing for excellent adhesion to the walls and underlying floor surface.
For best results, floor screed should have a minimum thickness of 65mm for traditional sand and cement, or 50mm for liquid screed, to ensure an optimal installation when used with warm water underfloor heating systems.
For heavily loaded floors, the minimum recommended thickness is 75mm.
No, floor screeding and self leveling are not the same. Floor screeding involves simply laying down a mortar-based mixture over the existing subfloor.
On the other hand, self leveling involves pouring a latex additive-based mixture over the existing concrete subfloor that helps it to level out any bumps and irregularities.
In conclusion, floor screed is a vital component of any construction project, providing a smooth, even surface for various flooring finishes and applications.
By understanding the different types of screed, their specific benefits and drawbacks, and factors such as cost, thickness, and design criteria, you can make informed decisions about the best screed for your project.
Whether you choose to hire a professional or attempt DIY screeding, a well-executed floor screed installation will result in a high-quality, durable, and long-lasting flooring solution that you can be proud of.
We Aim To Reply To All Enquiries With-in 24-Hours